
I have a senior this year, and while I’m not exactly sure how I got to this point, I do know that everything happens in a flash: order a yearbook (check), order the cap and gown (check), schedule the senior pictures (check), go through said senior picture proofs (check and wipe tears)… then it all happens within months: prom, senior sunset, graduation practice and graduation! When someone tells you “don’t blink” believe them!

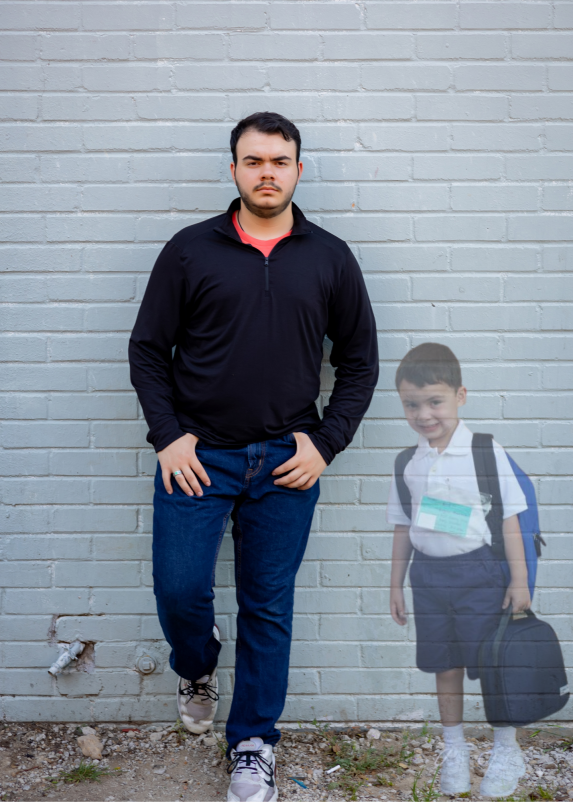
Someone really clever created a picture composite called a don’t blink senior picture. The idea is to take a picture of your senior when he or she was younger and pair it with a current senior picture. The current picture might be the senior playing a sport, wearing a cap and gown or just hanging out. Or, you can combine two senior pictures, as I did above.
I’ve been asked how to make a don’t blink senior picture about one hundred times, and it’s rather simple if you have Canva!
Step 1: open Canva.
Step 2: click on “create a design” and choose your desired size. I always go with 5×7 inches.
Step 3: gather 2 photos you’d like to use in your don’t blink picture and upload them.
Step 4: click on “uploads” and find your main photo, preferably one with a large “plain” background. (*If you need a blank background, see optional step below.)
Step 5: click on “uploads” again, this time choosing the 2nd photo. With the blue “edit” box still around the 2nd photo, click on “edit image” at the top. From there, you will click on “BG Remover” or “Background Remover”. If all looks well, hit “apply” and you’ll notice that the background of image 2 has been erased. *See tip below if you don’t have Canva Pro.*
Step 6: position image 2 where you want it to be on photo 1.
Step 7: Click on the “transparency” button that’s located next to the trash can, at the top. It looks like a fading checkerboard. Use the slider to adjust the photo, as desired.
Step 8: Click on “file” and then “download” to save your image!
Step 4 (optional): click on “elements” and find your background, IF a plain one is needed. You’ll notice I added the white brick background in the first photo above, but the second picture was already taken in front of white bricks, so it wasn’t necessary. This is completely your choice. If you chose a background, add it to your blank project before proceeding to step 5.
TIP: If you don’t have Canva Pro, you will need to remove the background of photo 2 through a different website such as this one. Once you save from there, you can upload that image as instructed above and proceed with step 6.