
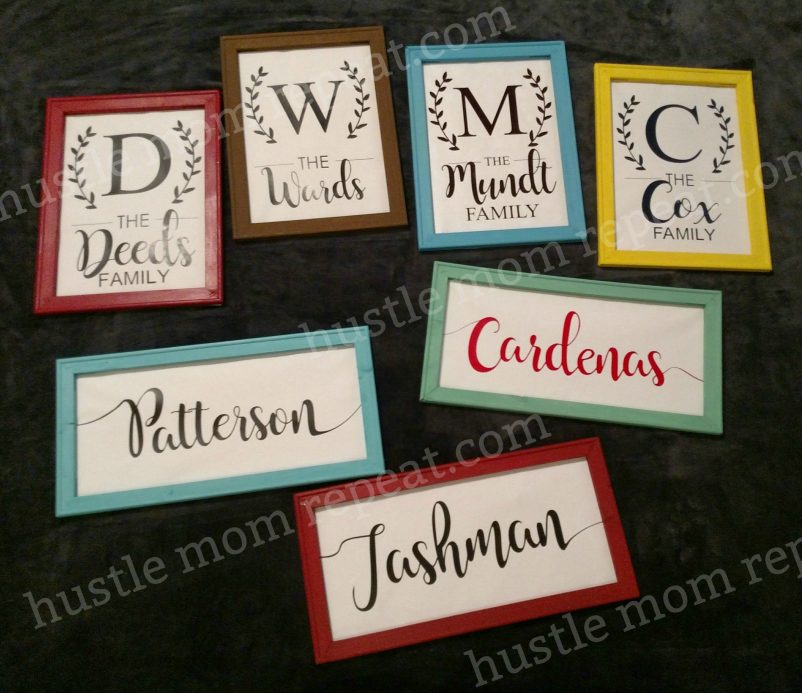
Have you seen the new signs using the reverse canvas method? These signs are cute, stylish and modern, plus they make the perfect gift for any occasion! This DIY to make your own reverse canvas is easy to follow, and the possibilities of colors, sizes and sayings are endless!
(*Keep reading to see successful reverse canvas tips!)

To make these reverse canvas signs you will need:
- A Canvas wrapped frame – these stretched canvases are usually located in the art section of either Michaels or Hobby Lobby, and can be purchased in single or multiple packs.
*When you buy the canvas, you might not see the actual frame. It’s “hidden”. - Wood stain or acrylic paint (I add a few drops of water to my paint to make it thinner.)
- A sponge or paintbrush
- Scissors
- A flat screwdriver
- Heat Transfer Vinyl or HTV
- A Silhouette or Cricuit cutting machine
- A stapler or staple gun
- A heat press or iron to apply the HTV
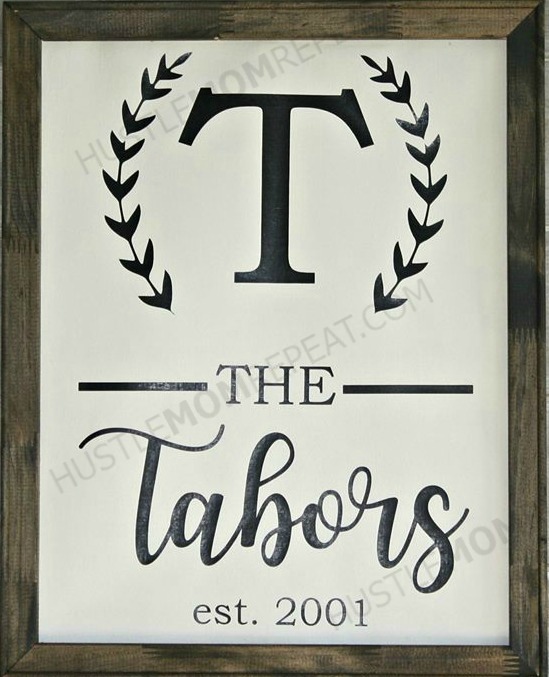
- SVG DESIGN – the one pictured can be found here
- Command Strips for the back – they can be purchased on Amazon
DIY Reverse Canvas Sign Instructions
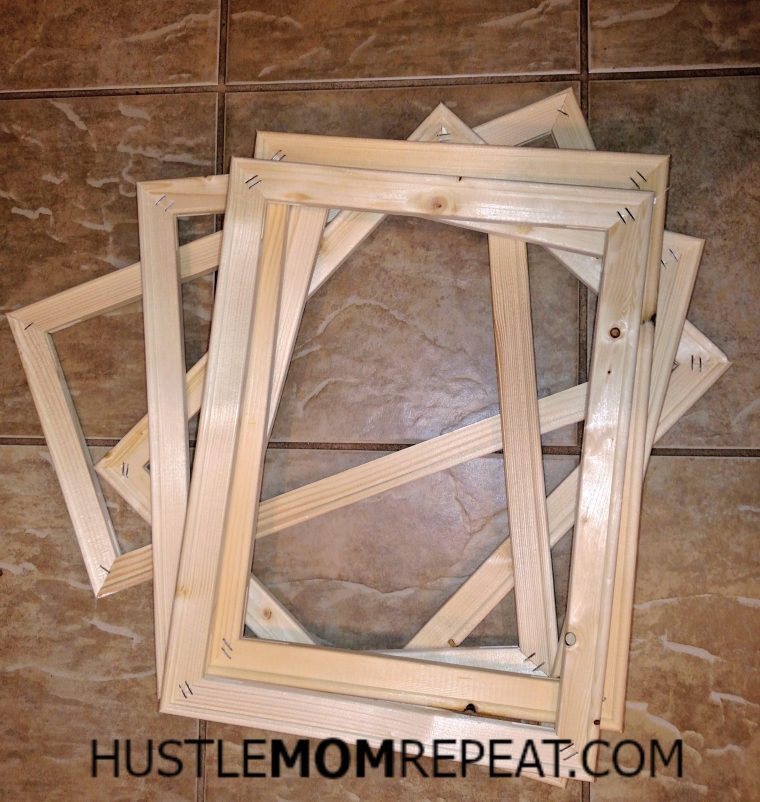
- Unwrap your canvas from the plastic protector and turn it over. You’ll see the hidden frame, which is being held onto the canvas by staples.
- Now you want to gently, but completely remove the canvas from the frame. Do this by scoring the canvas (with your scissors) on the far end of the staples. I make one big line down each side, then “rip” off the small strips that were just scored. Be careful not to rip your canvas. (This gets easier as you go. Trust me!)

- Now you are left with two pieces: the canvas and the frame. Set the frame to the side. You don’t have to remove those staples on the front or the back!
- The canvas itself will have a “dent” or “fold line” from being held onto the canvas. You want to trim the canvas on the line closest to the center of the canvas. Yes, the entire side. You will cut off about 1 inch. Try to cut straight on that line, but it’s okay if the line isn’t perfect.
- At this point, I put the canvas aside (in a safe, flat place) and work on the HTV and frame.
- Cut your design with heat transfer vinyl (HTV) but make sure you can fit it on the canvas you just trimmed. You will need to account for the frame, so adjust your design accordingly. Measure your space with the frame on top of the canvas you just trimmed. *Make sure you MIRROR your design before cutting.
- Now, I like to switch back to the frame and set the HTV to the side. This is a good time to stain or paint your frame. I don’t paint the back, but I make sure to get inside each crevice and hole with a paintbrush. Don’t worry about the staples on the front of the frame, just paint over them. (You can also remove them and use putty to cover the holes.)
- Let the frame dry completely. Any wetness or paint will mark the canvas, which is why you want the frame to be nowhere near the canvas while it’s wet. Trust me on this!
- While the frame is drying, use this time to weed your HTV image and apply it to the canvas with an iron or heat press.
- When the frame is dry, position the canvas over the back of the frame. Using a staple gun, re-attach it to the back of the wooden frame using a stapler or staple gun.
*I like to pull the canvas tight while stapling: Start at the top center, then staple the bottom center. Look at the front and make sure it’s right. I then pull the sides and staple the left center, then the right center, then staple the corners and gaps evenly between.
TIPS FOR MAKING A REVERSE CANVAS CAN BE FOUND HERE!
There you have it – A DIY Reverse Canvas Sign in 10 easy steps! I’d love to see your creations -Tag me on social media @HustleMomRepeat if you make these!
62 Comments
I was looking at doing a 12 x 24 but it has a wood piece down the middle of the frame for support. I was wondering if I could just cut that piece of wood off. Any thoughts?
I have removed that piece of wood before and it worked just fine! Good luck!
How did you remove the middle bar?
Yes, I’m looking at a larger canvas, but how do you remove the middle bar?
I took out the staples holding it together on one corner and took out the middle bar. Then stapled back where I had removed the previous ones
How did you remove it????
Thank you for the great tutorial! I know that it’s called a “reverse” canvas because the wood frame is on the front now, but I’m confused as to which side of the canvas to apply the htv to, the front or the back? Thanks!
Apply the canvas to the white side (the front.)
I used the tan side for one of my projects it looks super cute too.
I’ve always wondered how to do these! Thanks for this easy tutorial. How would you suggest adding something to the back for it to hang on a wall?
I use these: http://amzn.to/2Dimk3v
Please share a picture of your finished project on my facebook page:
http://www.facebook.com/hustlemomrepeat
I’m trying to determine what this instructions is telling me and what is the purpose. Can u explain further. Thanks.
You want to trim the canvas on the line closest to the center of the canvas. Yes, the entire side. You will cut off about 1 inch.
Kim, cutting that line makes it easier to remove the canvas from the frame.
I saw this on Pinterest and was intrigued as I had no idea what a ‘reverse canvas’ was and now, I’m keen to give it a try! Great tutorial, Dawn, thank you! Sue x
Make sure you share a picture with me on facebook or instagram @HustleMomRepeat!
I am not strong enough to use my husband’s manual staple gun. Anyone have any recommendations to one that might be easier? I hate waiting on his schedule to staple the canvas back on!
Have you tried a regular office stapler?
I use an electric staple gun from harbor freight. I paid around $20 for it. One of the best investments I’ve ever made.
I am curious if you have to use the white side or can you use the linen side?
I use The linen side on all mine.
What type of staple gun do you use? Mine never wants to staple through the wood and just bends sideways. Ugh!
Do you have to use HTV or can you use 631 vinyl stencil and paint your design on to the canvas?
I’ve used 651 and 631 with my heat press and it worked great. You don’t have to mirror the image when using vinyl. I use the temp of 225 and press for about 10 seconds.
Great instructions. Ty for sharing. Can 651 be used as a stencil and just paint using acrylic?
I bet you could. I would put the stencil on, then modge podge the cut out portion, then paint over. I think this would prevent the paint from bleeding.
Of course, that’s what I would do, but I haven’t tried it. Let me know how it comes out!
Your tutorial is awesome! I’m making a 16×20 sign that reads “this kitchen is for dancing” in portrait format. Having difficulty deciding how large the letters should be. Any tips you could offer?
Thanks!
Could you tell me what you used to make the leaves? I would like to do one of these for a housewarming gift.
I want To try the hth on canvas,how long and what temp to use with heat press?
This was great, but have one question, How would you use a regular iron?
Do you have the svg you used for this or can I buy one and just change the name/initial?
https://www.etsy.com/listing/573251038/reverse-canvas-design-svg?ref=listing_published_alert
Every canvas I’ve bought has cut out places on the wood where the frame goes together. Did you putty those or just leave them? I’m worried they’ll be noticeable.
I don’t, but you can. I just paint or stain the inside of that hole and it’s very unnoticeable!
What do you put on the back to hang it?
I use Command strips!
http://amzn.to/2Fotjd4
Thanks for the great tutorial . I was wondering if you could paint the canvas another color before applying the vinyl. If so, what kind of paint would work best?
I was wondering the same thing.
I would try painting a strip of excess that you cut off. Paint that, then try to iron on the HTV. Then, if it doesn’t work, there’s no waste!
Let me know how it works!
i paint my canvas (kind of sloppily) with a grayish brown chalk paint then over it with a white chalk paint to make it look distressed. the permanent vinyl will stick to it. i sealed over mine with matte gesso/mod podge to be sure though.
I painted my canvases before. I used acrylic paint. Then I applied permanent vinyl 9nstead of having. It worked great.
My iPad auto corrected. Htv to having when I pushed to add it.
When I bought my 20 x 24 frame it has a piece of wood attached to the frame in the middle for support I am assuming. SO i looked at getting a 16×20 and same thing. What do I do?
Can you show me what the back looks like with the staples?
I did one but the iron melted my canvas – how do I avoid this – I do not have a heat press
Monica, Make sure you are putting a protective sheet over the vinyl on the canvas. I like to use parchment paper!
I put mine on the back of the canvas, then I use my iron to make it “seal”, do you know how I can make it weather proof to put outside on a patio?
Once you are putting the canvas now on the back of the painted/stained frame.. are you just stapling it? Are you able to hang it? That part I dont quite understand.
Great tutorial! I made my first today for an upcoming baby shower gift. Not perfect but I’m happy!
Do you remove the stapels in the 4 corners on the front side or just leave them
Thank you for the great tutorial. I attempted a reverse canvas last night and did not account for the frame and put the wording too far off to the sides..grrr!! I really messed up, is there any way to fix this and just make it a regular canvas again? Or just start all over? It was looking so pretty too. And my letters were a pain to weed! Thank you
If you are using HTV and you mess up, you can use VLR or magic vinyl remover.
Both remove the HTV without messing up your canvas. And the chemical evaporates, so no washing or extensive drying time before getting back started on your party.
Julie H recently posted…Installing Fonts for use in the Silhouette Studio Software
Do I have to use htv? Can I just use regular vinyl without heat or will it not stick to the canvas?
I used 16×20 canvas and frames to make chalk boards (painted the canvas with chalk board paint), but I can’t get the canvas stretched properly when I reattach it. I used painters tape to stretch and position it before stapling it on and it looked fine, but when I turned it over it wasn’t as tight as I hoped. Is this normal or does someone have trick to prevent this?
so I have ordered the canvas but now in stuck on what vinyl I need to order. I have an inkjet printer. I feel like it should be white that way the black letters show up and can transfer. am I right or totally wrong lol
Has anyone tried this with black canvas? Michael’s has them on sake this week & I’m thinking of trying this with white HTV.
White HTV on black canvas would look super. I know I should of got some.
my 12 x 24 canvas has a piece of wood down the center. How do you remove this?
What a wonderful tutorial! I was having a problem with which side to apply the htv to, but, I finally managed to figure it out. Great work, and thank you.
Thank you for the great tutorial! I made a reverse canvas and it turned out great! However, it looks the the adhesive from the Cricut Iron On vinyl kinda bled around the edges. Any idea what I did wrong? I used parchment paper as a protective layer and a Cricut Easy Press.
Im confused on why you say to “mirror” yiur image. If you weed it out and use transfer tape to put it on not sure qhy you need to kirror it. Can you elaborate on this for me. Thanks!
I am not strong enough to use my husband’s manual staple gun or you use heat press machine. Does anyone have any recommendations for one that might be easier? I hate waiting on his schedule to staple the canvas back on!
Your way of working to make canvases are very easy. Good Luck!